
Gardening: Understand Your Tomato Pruning
- LEAF AND BEAN FARM
- Jul 20
- 5 min read

Updated: Jul 22
Why we prune tomatoes
Hello Neighbor
One of the quickest ways to overwhelm a new gardener is handing them a pair of pruners before they understand what they’re actually cutting.
Tomato pruning sounds complicated at first because people throw around terms like suckers, topping, airflow, determinate, indeterminate, and disease control all at once.
But once you understand why we prune tomatoes, the whole thing becomes much easier to manage.
You are not trying to make the plant look pretty. You are managing airflow, energy, sunlight, and disease prevention.
And honestly? Tomatoes reward steady maintenance far more than perfection.
Step 1: Understand Your Tomato Type
Before you prune anything, you need to know what kind of tomato plant you’re growing because different tomatoes are pruned differently.
Indeterminate Tomatoes
These are vining tomatoes that continue growing and producing until frost kills them.
Common examples include:
Brandywine
Cherokee Purple
San Marzano
Sungold
These are the plants most gardeners prune heavily because they can quickly turn into massive tangled jungles.
Determinate Tomatoes
These tomatoes grow to a set size, produce most of their fruit in a shorter window, and then slow down.
Examples include:
Roma
Celebrity
These need much lighter pruning because over-pruning can reduce your harvest by removing future fruiting branches.
That distinction matters more than most beginners realize.

Why We Prune Tomatoes
The goal is not to punish the plant or strip it bare.
We prune tomatoes to:
Improve airflow
Reduce disease pressure
Increase sunlight penetration
Direct energy into fruit production
Keep plants manageable
Prevent soil from splashing onto leaves
Help fruit ripen faster
Healthy pruning creates healthier growing conditions.
Tools You’ll Need
You truly do not need a complicated setup.
Hand Pruners
Bypass pruners work best because they make cleaner cuts.
Use them for:
Thick stems
Mature suckers
Diseased growth
Your Fingers
Honestly, your fingers are one of the best pruning tools for tomatoes.
Small suckers snap off easily when they’re young.
Garden Gloves
Optional, but some people find tomato plants irritating to their skin.
Disinfectant
This becomes extremely important if a disease appears in the garden.
You can use:
70% isopropyl alcohol
Lysol wipes
10% bleach solution
Always clean tools between diseased plants.
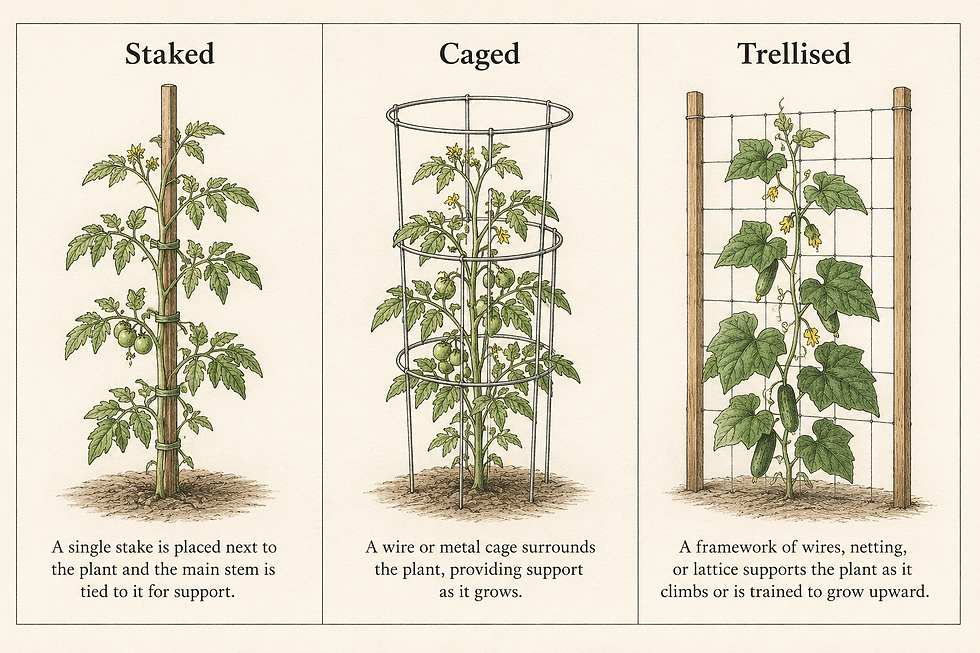
Support Systems Matter Too
Pruning works best when paired with support.
Tomatoes become much easier to manage when they are:
Staked
Caged
Trellised
Florida weaved
Unsupported tomatoes often trap moisture and create ideal disease conditions.
Understanding the Tomato Plant
Before pruning, you need to identify four major parts of the plant.
Main Stem
The central trunk of the tomato plant.
Leaf Branch
Regular branches holding leaves.
Flower Cluster
Where tomatoes will eventually form.
Suckers
This is the important one.
A sucker grows in the “armpit” between:
the main stem
and a leaf branch
If left alone, that sucker becomes an entirely new stem capable of producing more tomatoes.
That sounds great at first, but too many suckers can create:
overcrowding
poor airflow
tangled plants
smaller fruit
higher disease pressure
Stage-by-Stage Tomato Pruning
Seedling Stage (2–6 Weeks)
At this stage, avoid heavy pruning completely.
The plant needs leaves to create energy.
What you can remove:
damaged leaves
yellow leaves
diseased growth
Avoid:
topping seedlings
removing healthy growth
stressing young plants unnecessarily
If seedlings become leggy, do not try to “fix” them by aggressive pruning.
Instead:
increase light
use a fan
bury stems deeper at transplant
Tomatoes can grow roots along buried stems, which actually helps create stronger plants later.
Transplant Stage
This is where pruning truly begins.
Before planting, remove the bottom third of the leaves.
Why? Because buried tomato stems can produce additional roots underground.
This creates:
stronger root systems
better drought resistance
sturdier plants overall
Also, remove any leaves touching the soil.
This single step helps reduce problems caused by:
blight
fungal spores
bacteria spread through soil splash
Early Growth: Choosing a Pruning Style
Once plants reach around 1–2 feet tall, you begin shaping the structure of the plant.
Single-Stem Method
Most suckers are removed.
Benefits:
excellent airflow
easier management
larger fruit
ideal for tight spaces
Downside:
fewer total tomatoes
Two-Stem Method
Keep:
the main stem
one strong sucker below the first flower cluster
For many beginners, this is the sweet spot because it balances:
airflow
production
manageability
forgiveness
Multi-Stem Method
Several suckers are allowed to grow.
Best for:
large gardens
cages
lower-maintenance setups
But it can become chaotic quickly if ignored too long.
How to Remove Suckers Properly
Small Suckers
Best removed when under 2–3 inches long.
Simply pinch sideways with your fingers.
Large Suckers
Use clean pruners.
Avoid tearing stems because damaged tissue invites disease.
And remember: Never remove huge amounts of foliage at once.
A stressed tomato plant may:
stall growth
develop sunscald
become vulnerable to disease
A good rule: Never remove more than about 25–30% of the foliage at one time.
Midseason Maintenance
This is where tomato plants often become jungles overnight.
Your weekly goals become:
airflow
disease prevention
support management
Every 5–7 days:
remove new suckers
remove yellow leaves
inspect for disease
keep the lower stem area bare
tie plants to supports
Consistency matters more than dramatic pruning sessions.

Common Tomato Problems
Huge Plant, Few Tomatoes
Possible causes:
too much nitrogen
too many suckers
overwatering
Dense Humid Growth
This creates ideal conditions for:
early blight
Septoria leaf spot
powdery mildew
Fix by thinning crowded interior growth and improving airflow.
Sunscald
White or yellow blistered fruit usually means too much foliage was removed too quickly.
Leaves protect tomatoes from the harsh summer sun.
During extreme heat, prune less aggressively.
Important Disease Prevention Rules
Never prune wet plants.
Wet foliage spreads disease rapidly between plants.
The best time to prune is:
dry mornings
after the dew has dried
Mulching also helps tremendously.
Use:
straw
shredded leaves
grass clippings
pine needles
Mulch reduces soil splash and helps conserve moisture.
Common Beginner Mistakes
Over-pruning
Ignoring support systems
Letting suckers become huge
Over-pruning determinate tomatoes
Using dirty tools
My Recommended Beginner Approach
If you are brand new to tomato pruning:
For Indeterminate Tomatoes
Use the two-stem method.
It gives:
strong airflow
solid harvests
manageable growth
room for mistakes
For Determinate Tomatoes
Only remove:
lower leaves
diseased leaves
crowded interior growth
Leave most of the plant alone.
Simple Weekly Tomato Checklist
Every week:
Check for suckers
Tie plants to supports
Remove yellow leaves
Inspect for disease
Keep lower stems bare
Harvest ripe fruit
Mulch exposed soil
Water deeply and consistently
That steady maintenance matters far more than one giant pruning session.
Homesteading Truth of the Week
Tomatoes do not need perfect gardeners. They need observant ones.
A Question for You
What tomato varieties are you growing this season? And are you team “carefully pruned” or “wild tomato jungle”?
Hit reply—I’d love to hear how your garden is growing.
— Nivek
Leaf & Bean Farm
Comments